JavaScript seems to be disabled in your browser.

You must have JavaScript enabled in your browser to utilize the functionality of this website. Click here for instructions on enabling javascript in your browser.

by Dave Zeckhausen
 
Brembo 2-piece rotors use lightweight, billet aluminum hats, attached to iron rotors (called "friction rings") by hardware allowing them to "float" and expand or contract freely with temperature changes.  Thus, they are known as "floating rotors."
 

Brembo Rotor Ring and Hat

Rotor (friction ring) attached to aluminum hat by two types of fasteners

Although not visible in the photo, the hardware passes through oval slots in the rotor, rather than circular holes.  Since iron and aluminum expand at different rates, the slots allow the rotor to expand and contract, unconstrained by the aluminum hat.  This reduces stress on the rotors at high temperatures and extends their life.  Conventional 1-piece rotors may distort into a cone shape during race conditions, leading to accelerated rotor cracking, soft pedal, and tapered pad wear.  Floating rotors have none of these problems.

To allow expansion and contraction of the rotors as they heat and cool, the attaching hardware must allow the parts to move, relative to each other.  However, the resulting rattle may be unacceptable for a street car.  Brembo developed an anti rattle system for the McLaren F1 Supercar, which is still used in many of their street kits.  Every other hole location utilizes McLaren anti-rattle springs and spacers to eliminate noise.


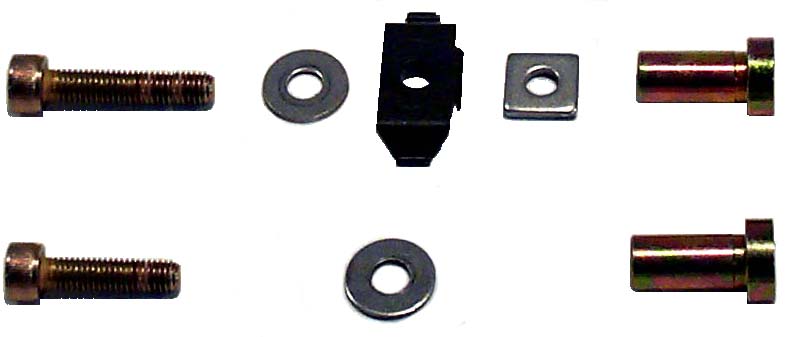
The retaining screw passes through a washer, then a spring clip, then a square spacer and, finally, into the threaded "float bushing" which is inserted through the hat and rotor from the outboard side.  The flat edge of the bushing fits against a raised feature on the hat, which prevents it from rotating as the screw is tightened.

It is normal for the five screws without spring clips to seem loose.  Do not try to tighten them!

McLaren Anti-Rattle Assembly

McLaren Anti_Rattle Hardware

Exploded view of the retaining devices used on each rotor assembly. 

Note that a longer screw is required when the McLaren anti-rattle clip is used and a shorter screw is required otherwise.  Each rotor/hat assembly is held in place by 10 fasteners, five of each type.  The brass float bushings are shown on the right side of the photo and they are the same, regardless of which type of fastener is used.

Assembly Instructions

  1. Remove old rotor from hat by unscrewing each fastener with a 5mm allen wrench.  Note the orientation of the McLaren anti-rattle clips so you can install them properly later.  Avoid using an Allen wrench with a worn tip, lest you strip the screws.  If a screw head does strip, remove it with vice grips and discard, replacing with new.  Remember, there are two different lengths of screws.

  2. It is strongly recommended mounting hardware be replaced each time rotors are changed. If you must reuse mounting hardware, clean the threads with a wire brush to remove any old Loctite or corrosion. Zeckhausen Racing does not sell McLaren anti-rattle hardware.  Please contact a Brembo dealer for these parts.

  3. If the new friction rings are not zinc plated, use brake cleaning spray and wipe with a rag to remove any anti-corrosion oil.

  4. Place the new friction ring on hat and insert a float bushing, flat side toward the hat's center.  The bushing should pass through the hat first and then extend through the slot in the rotor.

  5. Place a drop of high strength thread locking compound (e.g., Loctite 262 or Vibra-Tite 137) on the tip of a short retaining screw.


Just enough thread locking compound is used to fill the bottom 5 or 6 threads

  1. Place a round washer on the screw, insert it into the brass float bushing and tighten with your fingers.  You may tighten VERY gently with an Allen wrench, if it doesn't turn easily with your fingers.  Do not tighten fully yet.

  2. Skip a hole and install a second bushing, washer, and screw.  Don't forget the thread locking compound.

  3. After installing five short screws, it's time to start with the McLaren anti-rattle assemblies.  Insert a bushing through the hat, place a washer on a long screw, then a spring clip, then a square metal spacer.  Screw this assembly into the bushing, keeping the same orientation observed when removing the old rotor from the hat.

  4. In case you forgot the proper orientation, the rectangular metal tab that hangs down from the spring clip faces the center of the rotor/hat assembly.  The two wings that contact the rotor are oriented on either side.

  5. Tighten each screw to 62 inch-pounds of torque.  This is the same as 5 foot-pounds or about 7 Newton-meters.  It is a tiny amount.  Do not over tighten!  The screws that do not have spring clips under them will seem loose, even after being tightened to the proper torque.  This is normal.

Torquing Brembo Rotor Mounting Hardware

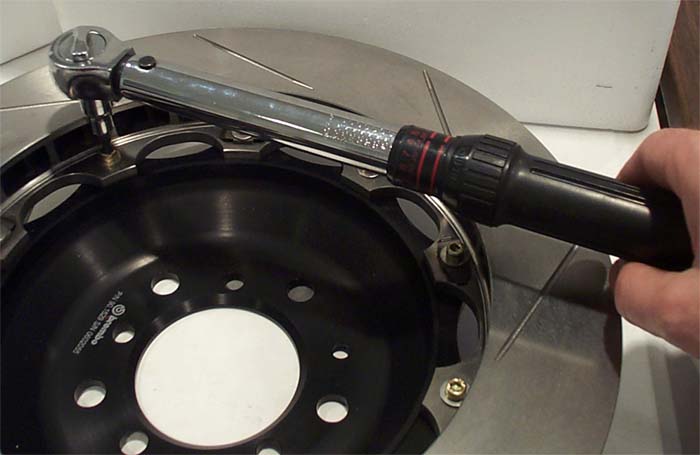
Tightening the rotor screws to 62 inch-pounds of torque


NEW ROTORS MUST BE BEDDED IN. The proper break-in procedure is documented here: Bedding in new pads and rotors

If you have any questions about rotor installation or any brake related issues, please call Zeckhausen Racing before you start taking things apart.

There are no products available in this category.