
BMW 5-Series Front Wheel Bearing Replacement
(1997 - 2003 Models)
by Dave Zeckhausen
How to determine if you need new wheel bearings
If you experience a low frequency rumbling, as if your car has snow tires installed, or if you experience pad knock-back, it may be due to bad wheel bearings. If you have high mileage (75,000 +), it is a good idea to replace the wheel bearings as a preventative measure while performing other work with overlapping labor, such as replacing shocks or brake rotors.
The E39 M5 uses different front bearings than the other E39 models. Make sure you buy the proper bearings for your BMW. See details and installation instructions below.
* Pad knock-back occurs as the result of high sideways loads on the tires from sweeping, high-speed turns. The wheel bearings/hubs deflect, causing the rotors to push the pads back into the calipers. The next application of the brakes may result in signifianctly longer pedal travel, as the gap between pads and rotors must close, before any actual braking takes place. When it's unexpected, pad knockback can be a startling experience!
Parts Required from your BMW parts counter or aftermarket supplier
(Zeckhausen Racing does not sell these parts)
|
BMW Part Number |
Description |
|
31-22-1-093-427 |
525i/528i/530i/540i Wheel Bearing (1 per side) |
|
31-22-2-229-360 |
M5 Wheel Bearing (1 per side) |
|
31-20-6-779-384 |
M12 x 1.5 (55mm long) bolts (4 per side) |
|
31-30-6-779-823 |
M12 x 1.5 (95mm long) pinch bolt (1 per side) |
|
33-32-6-760-374 |
Self-locking nut for pinch bolt (1 per side) |
|
|
QTY(4) Bearing Bolts with Loctite QTY(1) Pinch Bolt QTY(1) Nut for Pinch Bolt |
|
Required Hardware (1 set per bearing) |
|
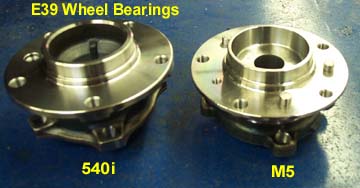 |
M5 wheel bearings have the same internal design as 528i/530i/540i bearings; however, they have three raised dowel pins which mate with matching holes in the M5 rotors. M5 bearings will not fit an E39 525i, 528i, 530i, or 540i with stock brakes.
|
|
If this is your first time changing E39 wheel bearings, you should budget three hours for the job and plan on two hours for the first side and one hour for the second. Subsequent bearing swaps take about 45 minutes per side, assuming you have air tools. |
|
|
The wheel bearing/hub assembly is secured from behind by four bolts. Two of the bolts are easily accessible. The other two are blocked by the shock absorber. This turns what should be a 5-minute job into the more complicated process documented below. If you are contemplating replacement of your front shocks, there is almost 100%overlapping labor with the bearing replacement, so you should consider doing both at the same time. |
|
|
Working on your car can be dangerous. Even quality jack stands can collapse, if not positioned properly. A floor jack can fail suddenly and without warning. You can be seriously injured or even killed if you do not follow proper safety procedures. Please use both a floor jack and a pair of jack stands to support your car, so a failure of any single support is less likely to result in the car falling on you. Zeckhausen Racing assumes no liability, expressed or implied, for any injuries or damages suffered as a result of following these instructions. The following steps are performed on a 540i and are the same for the M5. The 6-cylinder models (525i, 528i, 530i) have a different suspension configuration and these instructions, while close, do not apply exactly. You may wish to consult a service manual or a BMW mechanic before attempting this service.
If you are installing a big brake kit and your car has more than 60,000 miles, it is a good idea to change your bearings at the same time. The factory shock absorbers are the same part number for left and right sides. Marks on the back of the strut ("L" and "R") are lined up during installation with a slot on the back of the steering knuckle. Rather than using those marks, it's easier to draw your own with a marker. Clean the dirt off and mark one or two vertical lines on the strut and the aluminum knuckle. |
 Place the car on jack stands and remove the front wheels. Remove the brake calipers and rotors. I've upgraded to a big brake kit, which is why my brakes look different. Be careful of the black metal dust shield, which can be sharp and may cut your hands if you aren't careful.
A closer view of the alignment marks. A horizontal line is not required since the strut has a shoulder that sits firmly in the knuckle. Also, the strut will have a sharp boundary between the clean and dirty sections, so it will be obvious when it is seated fully in the knuckle. Once you've marked the strut, remove (and discard) the pinch bolt, which is shown to the right and slightly below the alignment marks. Use a wrench on one end to keep the bolt from rotating as you remove the nut. The pinch bolt holds a small bracket that supports the ABS cable and, on the driver's side, the brake pad wear sensor cable. After removing the pinch bolt, simply push this bracket out of the way. |
 Remove the 18mm nut and bolt holding the front lower control arm to the chassis. A good whack with a rubber mallet should pop the arm out. Label the bolt so it isn't confused with the strut pinch bolt removed in the previous step. When reinstalling, the bolt goes in from the rear and the nut faces the front of the car. Remove the 18mm nut and bolt holding the front lower control arm to the chassis. A good whack with a rubber mallet should pop the arm out. Label the bolt so it isn't confused with the strut pinch bolt removed in the previous step. When reinstalling, the bolt goes in from the rear and the nut faces the front of the car.
Note: If your BMW has auto-leveling Xenon headlamps, you will need to disconnect the suspension height sensor from the passenger's side control arm. Remove the nut from the swaybar end link where it attaches to the aluminum bracket. Use a 16 mm open end wrench to prevent the stud from turning while you remove the nut. Wiggle the end-link loose and push it out of the way. You may need to compress the suspension slightly with a floor jack in order to get the end link loose. Push it out of the way. |

A closer shot of the swaybar end link. The 16 mm wrench is placed BEHIND the bracket to keep the stud from rotating while the socket is used to remove the nut. |

Spray WD-40 or other lubricant on the lower part of the strut so it will be easier to slide out of the knuckle. Be careful not to wash away your alignment marks! Grab the steering knuckle and pull it down as far as you can. Your instinct will be to try to turn the knuckle side to side, but it is held firmly in place by the control arm and can't turn. Instead, grab the strut housing and turn the strut side to side while you pull down on the knuckle. This is where it helps to have a second person. Pull it down far enough that you can access the four bolts holding the bearing/hub assembly in place. |
 This is a view from behind. The knuckle has been pulled down so the strut is no longer blocking access to the upper two bolts. Be careful not to damage the ABS sensor wire.
An air wrench is helpful to remove these bolts, since the factory used a thread locking compound and the bolts are very long. You'll be sweating if you have to remove these bolts by hand. Depending on the age of these bolts, you may have to fight them with a breaker bar. They do not want to come willingly!
Discard the bolts after removal. They should be replaced. Note the orientation of the bearing assembly.
Install the new bearing assembly in the same orientation as the one you just removed using four new bolts. It only fits in one direction because the bolt holes are not spaced evenly. The new bolts come with dry Loctite already applied. If you find yourself reusing the old bolts (not recommended), apply thread locking compound. Tighten each bolt to 75 lb-ft.
After pushing the knuckle back up, make sure the marks on the strut align with the marks on the knuckle. Use a floor jack to compress the suspension, but be careful not to lift the car off the jack stand.
Position the lower control arm back into the chassis bracket and slide the original bolt through and attach the nut. Don't tighten yet until the suspension is compressed in the next step. The chassis bushing will be damaged if you tighten this fastener while the suspension is in full droop.
Compress the suspension with a floor jack until the car is just about to lift off the jackstand. Torque the lower control arm bolt to 60 lb-ft.
Install a new pinch bolt and nut and torque to 50 lb-ft. Don't forget to reinstall the bracket, which is held in place by the pinch bolt.
Insert the stud from the sway bar end link into the bracket and tighten, using a 16mm wrench to keep it from rotating, while you tighten the nut to 30 lb-ft.
Congratulations! You've just changed your own wheel bearings.